Shading Practice
Free Shading Practice Tool for Art Teachers & Students
Use our interactive shading reference tool to understand light, shadow and value in art.
What is this shading practice tool?
Value is one of the most essential — but most difficult to teach — elements of art. Students understand that shadows exist, but knowing how light behaves on a three-dimensional form is a different skill entirely. That’s where the Shading Practice Tool comes in.
This free, browser-based shading reference lets you interact with a 3D form and a moveable light source in real time. Shift the light, and the shadows shift with it. Rotate the form, and the value relationships change. No static diagrams. No frozen examples. Just a live shading reference you can actually explore.
Whether you’re introducing value for the first time, reviewing the zones of light and shadow or giving students a visual anchor during a shading practice session — this tool gives you something to show, not just explain.
What is Value in Art — and Why Is It So Hard to Teach?
Value is the element of art that describes how light or dark something is — independent of its color. It’s what makes a drawing look three-dimensional instead of flat. Students can memorize the definition easily enough, but truly understanding how light creates value on a form requires seeing it change in real time. That’s exactly what this shading reference tool was built for. Move the light source, watch the shadows respond, and value stops being a vocabulary word and starts making sense.
How to Use the Shading Practice Tool in Your Art Class
Step 01
Open & Explore
Open the Shading Practice Tool and take a look at the 3D form on screen. Before diving into a lesson, give yourself a few minutes to move the light source around and watch how the shadows respond. The more familiar you are with it, the more confidently you can guide students through it.
Step 02
Name the Zones
As you move the light source, point out each zone of light and shadow by name — highlight, light area, midtone, core shadow, reflected light and cast shadow. Students learn the vocabulary faster when they can see each zone appear and disappear in real time rather than studying a static diagram.
Step 03
Let Students Drive
Hand control of the light source to your students and let them explore independently. When students are the ones causing the change, the understanding sticks. Ask them: what happens when the light moves below the form? What changes when it moves directly overhead?
Step 04
Do Drawing Practice
Use the Shading Practice Tool as a live shading reference while students work on their own drawings. When a student asks where a shadow goes, pull it up and show them on the form instead of describing it. Then have them replicate what they see.
A quick tip…
Keep the Shading Practice Tool open on a second screen or device during studio time. Students can reference it independently whenever they need a shading reference mid-drawing.
What Makes the Shading Practice Tool Different From Other Shading References?
Built for art class
Most shading references are static images — a frozen diagram that shows one lighting scenario. This tool was built specifically for art education, with an interactive 3D form that responds to your input in real time. That difference changes everything about how students understand value.
Moveable Light Source
Drag the light source to any position and watch every zone of shadow respond instantly. Overhead, side-lit, backlit, low angle — students can explore any lighting scenario in seconds without resetting a physical still life or waiting for the sun to move.
Visible Light Zones
Highlight, light area, midtone, core shadow, reflected light and cast shadow — all six zones of light anatomy are present and visible on the form at all times. As the light moves, each zone shifts so students can see exactly how they relate to each other.
No Setup Required
No physical lamp, no still life arrangement, no repositioning objects mid-lesson. Open the Shading Practice Tool in any browser on any device and your shading reference is ready, immediately. Works on Chromebooks, laptops, tablets and desktops.
Use it as a reference
Keep the tool open on a projector or second screen during studio time. When a student asks where a shadow falls, you can show them on the form rather than trying to describe it. A live, visual shading reference is worth a thousand repetitive verbal explanations.
No account required
The Shading Practice Tool is completely free to use. No login, no subscription, no downloads. Students and teachers can open it in any browser and start exploring shading and value immediately — no barriers between them and the practice.
How Can You Use the Shading Practice Tool in Your Classroom?
Shading Warm-Ups
Open the tool at the start of class and use it as a daily shading reference before any drawing lesson begins.
Value Studies
Have students observe and sketch the zones of light and shadow they see on the form during structured shading practice sessions.
Still Life Prep
Before setting up a physical still life, use the tool to discuss where shadows will fall and what students should look for.
Direct Instruction
Project the tool full-screen while you teach. Move the light source live as you name each zone — no diagram needed.
Draw from Observation
Use the form as a simplified still life reference for students who struggle with how to shade a drawing from a complex subject.
Independent Practice
Leave the tool open on a device during studio time so students can self-reference mid-drawing without interrupting you.
Assessment Prep
Review the six zones before a shading quiz or drawing assessment to bring the concepts back into focus quickly.
Art History Connection
Connect the tool to master artists who used dramatic light and shadow like Rembrandt, Caravaggio and Goya.
Value Reference: The Zones of Light and Shadow
Every three-dimensional form lit by a single light source shows the same zones of value. Learning to identify these zones is the foundation of shading practice. Use the Shading Practice Tool to find each one on the form and watch how they shift as the light moves.
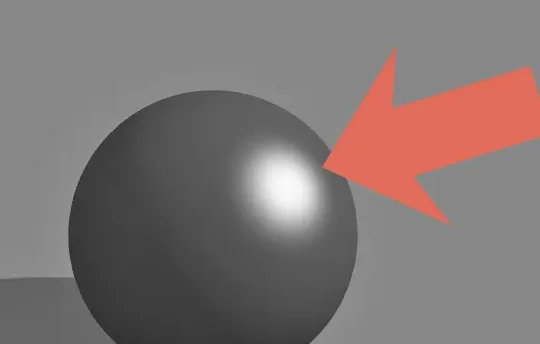
Highlight
The highlight is the brightest point on the form. This is because the highlight is where light strikes most directly. The highlight is small and sharp on smooth surfaces, softer and more spread out on matte or rough ones. It moves with the light source.

Light Area
Light area refers to the broad area of an object or scene that is facing the light source. This zone surrounds the highlight and contains subtle value variation that students often flatten into a single tone. Look carefully — it’s rarely one uniform value.

Midtone
The midtone on a form is the transitional zone between the light side and the shadow side. Midtones should look like a smooth, gradual shift — not a hard edge. This is where many beginners go wrong, as they jump too abruptly from light to dark.
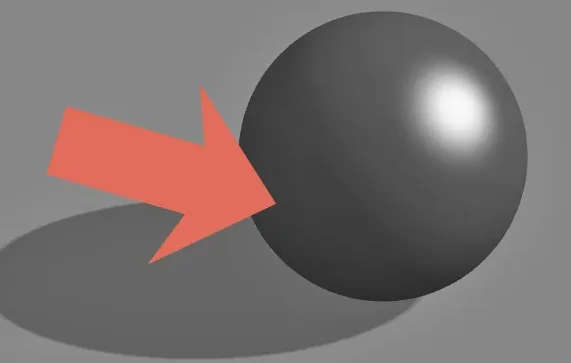
Core Shadow
The core shadow is in the shadow area of a form and is the darkest value on the form itself. This band of darkness is located where light can no longer directly illuminate the object, appearing just past the terminator line (where light turns to shadow). Tip: the cast shadow is usually darker than the core shadow.
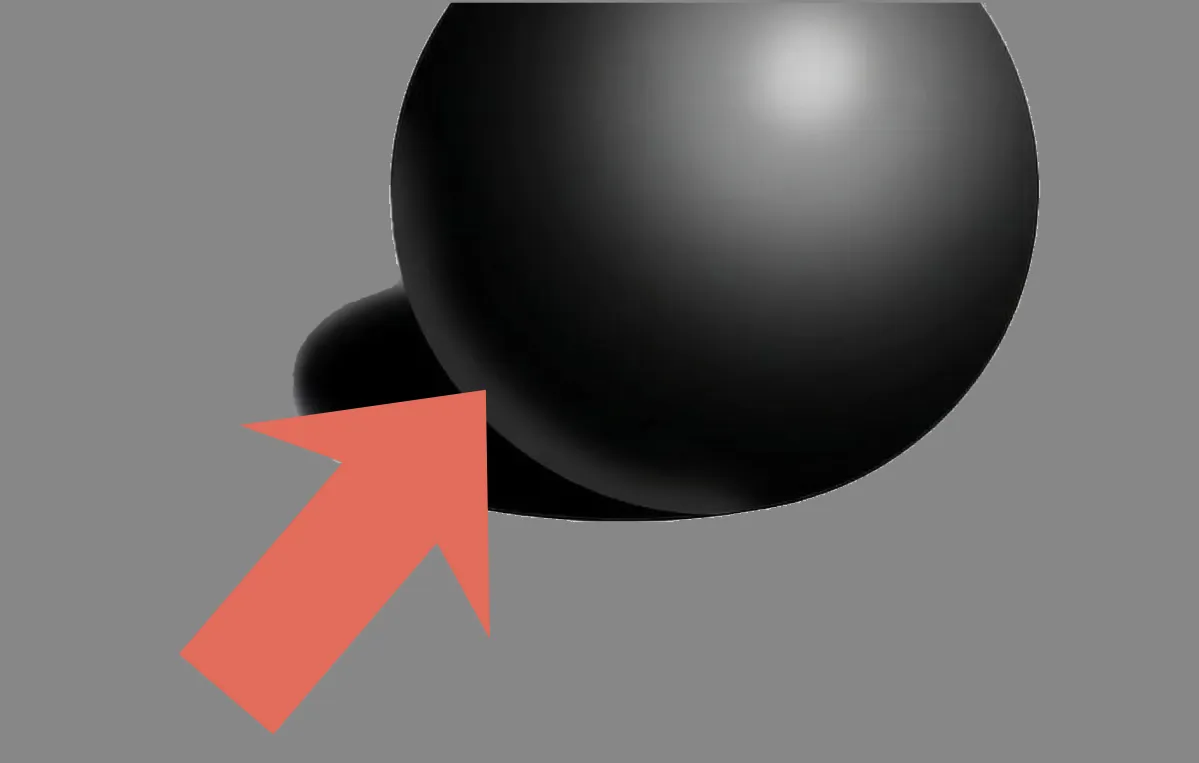
Reflected Light
Reflected light refers to the subtle lighter area at the base of the shadow side, caused by light bouncing off nearby surfaces. It is always darker than the midtone — students frequently make it too light, which flattens the form. This is the zone that separates beginner shading from convincing shading.
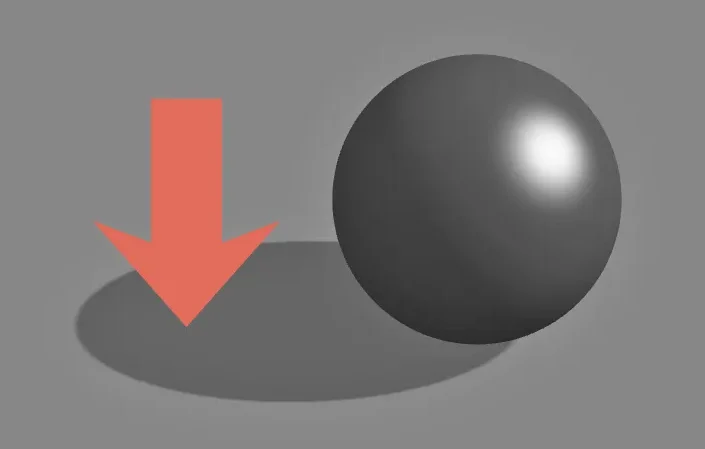
Cast Shadow
The cast shadow is the the shadow that the form throws onto surrounding surfaces. The cast shadow is darkest closest to the object, softening and lightening as it extends outward. The cast shadow anchors the form to its environment and tells the viewer where the light source is coming from (it’s always opposite from the light source).
Artist Spotlight
The one of the best ways to understand value shading is to study artists who mastered it. These three painters used light and shadow as their primary tool for creating emotion, depth and form. Their work is still the most direct references for anyone learning how to shade a drawing with real conviction.
Caravaggio (1571-1610)
Michelangelo Merisi da Caravaggio was an Italian Baroque painter who pushed light and shadow further than anyone had before him. He didn’t invent chiaroscuro — the technique of using strong contrast between light and dark — but he made it dramatic in a way that changed Western painting permanently. His scenes feel lit by a single harsh light source cutting through darkness, giving his figures an almost cinematic presence. He was also, famously, a fugitive for part of his life after killing a man in a brawl, which makes his biography as gripping as his paintings.
For students, Caravaggio is the clearest illustration of value in art can do real work. His rendered shadows are deep and abrupt. His highlights are sharp and exactly placed. He uses very little gradual midtone — light and shadow meet at a hard edge that gives his subjects sculptural weight. If you want students to immediately understand what strong value contrast does to a drawing, show them a Caravaggio. The lesson lands fast.
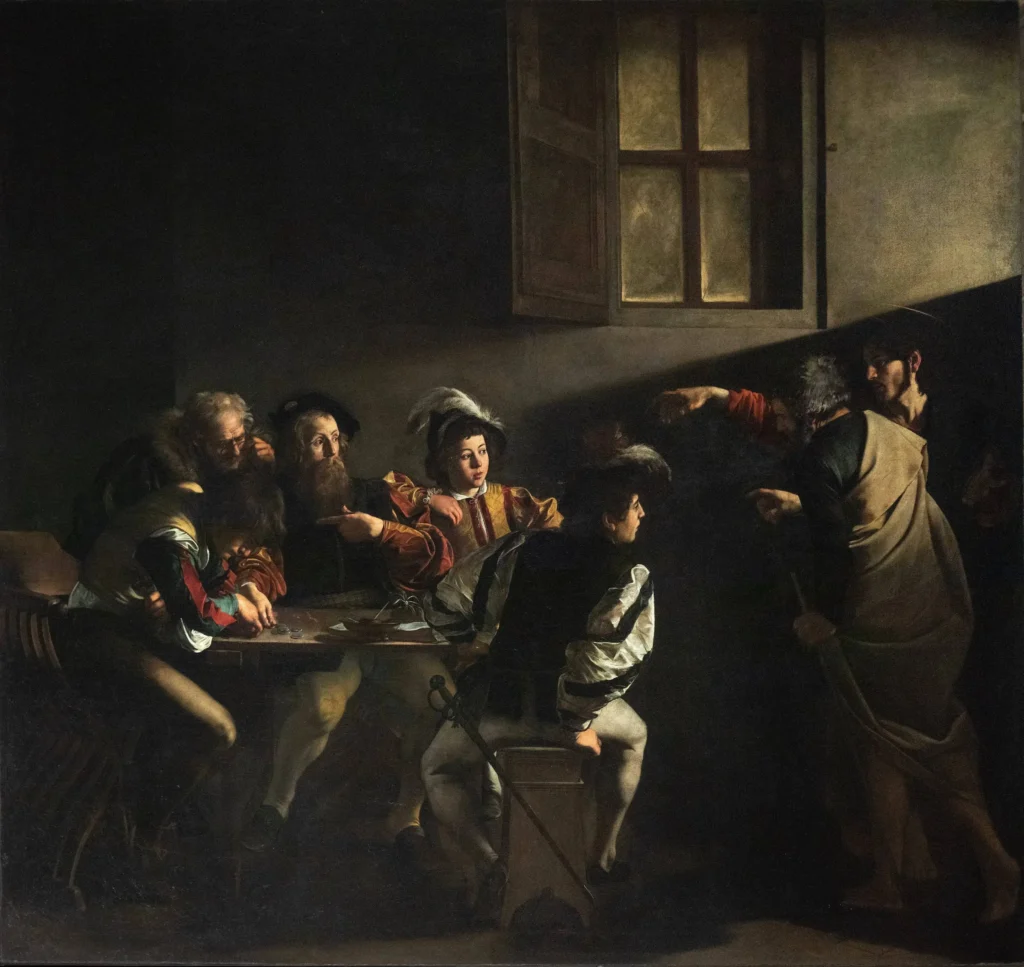
Wikimedia: Caravaggio – The Calling of St. Matthew (1599-1600)
Artemisia Gentileschi (1593-c. 1656)
Artemisia Gentileschi was one of the most accomplished painters of the Italian Baroque period and the first woman admitted to the Accademia delle Arti del Disegno in Florence. She grew up surrounded by Caravaggio’s influence — her father Orazio was a committed Caravaggist — and she absorbed that dramatic lighting vocabulary early.
Her personal life was extraordinarily difficult: she survived assault by her painting tutor and testified against him in court, which was nearly unheard of for a woman in 1612. She was actually subjected to thumbscrews during her testimony — a torture technique used to “verify” her story and she endured it. Her assailant was found guilty but served very little of his sentence. Gentileschi channeled these experiences directly into her work.
What makes Gentileschi worth studying alongside Caravaggio is how differently she uses the same art shading tools. Her shadows are just as deep, but her light feels less like a spotlight and more like a choice — it falls on exactly who she wants it to fall on. Her figures feel powerful rather than exposed. Comparing her work to Caravaggio’s is one of the most effective ways to show students that value shading isn’t just a technical skill. It’s a decision with emotional consequences.
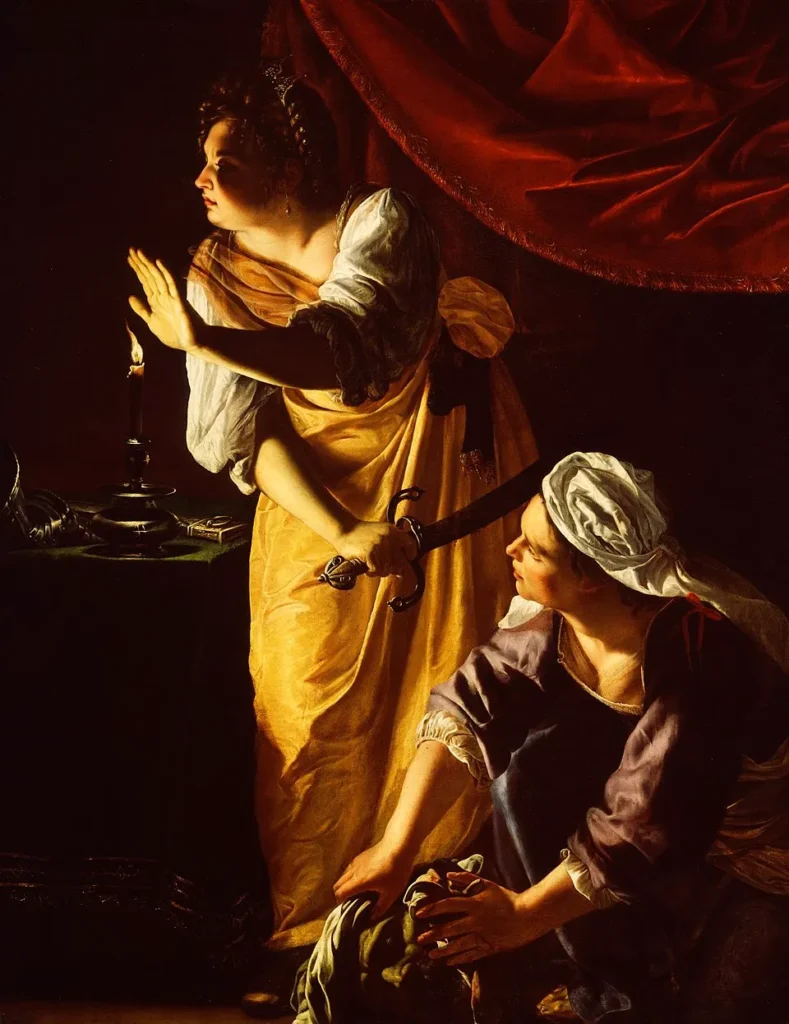
Wikimedia: Artemisia Gentileschi – Judith and Her Maidservant (c. 1623–1625)
Rembrandt van Rjin (1606-1669)
Rembrandt van Rijn was a Dutch Golden Age painter and one of the greatest portraitists in the history of Western art. His approach to value is worth comparing directly to Caravaggio’s, because they’re solving similar problems in completely different ways. Where Caravaggio used contrast for drama, Rembrandt used it for intimacy. His light feels warm and internal — like it glows from within the surface — and his shadows have an atmospheric softness that pulls you toward the subject rather than cutting you away from it. He went bankrupt late in life and had to sell his home and art collection at auction, but he kept painting until the end.
As a value reference for students, Rembrandt is especially useful for understanding the midtone range. He rarely pushed to Caravaggio’s extremes — most of his tonal work lives in the middle values, with a few carefully placed highlights doing the heavy lifting. For students learning how to shade a drawing that feels real rather than theatrical, Rembrandt is the model. He shows that restraint with shadow is a skill, and that knowing where not to go dark is just as important as knowing where to go darker.
Fun Fact: Rembrandt’s influence didn’t stop at painting — the triangle of light he placed on his subjects’ shadowed cheeks is now a named lighting technique used by portrait photographers and film cinematographers worldwide, literally called “Rembrandt lighting.”
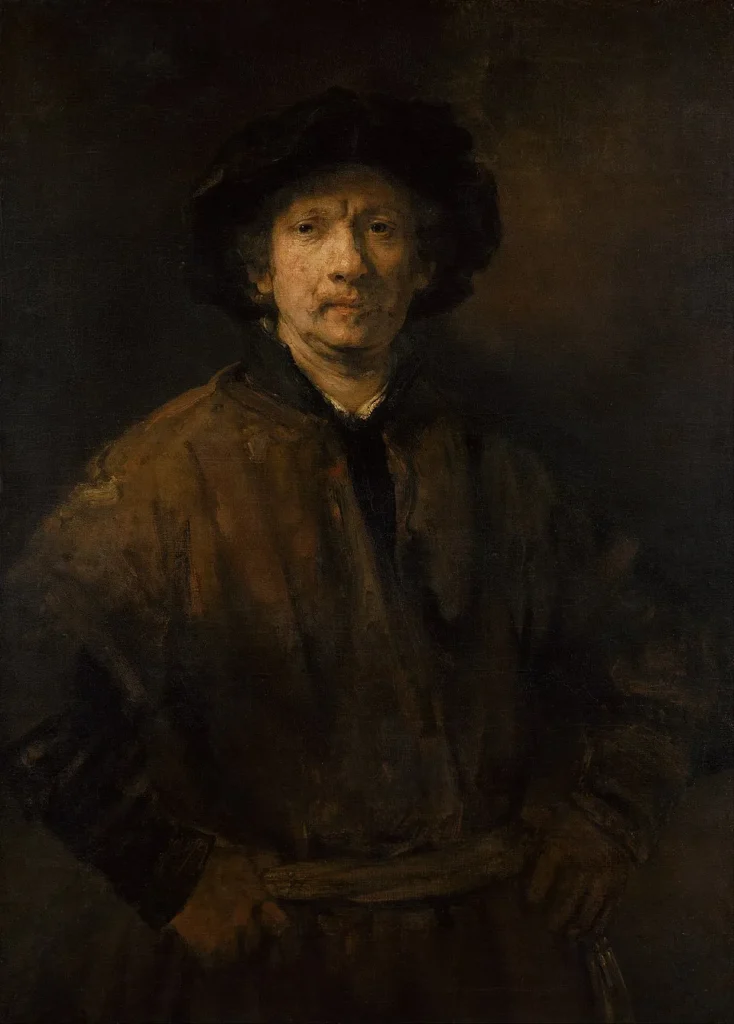
Wikimedia: Rembrandt van Rjin – Self-Portrait (1652)
Frequently Asked Questions
Looking for answers about our Shading Practice Tool? Browse these FAQs! If you still can’t find the answers you need, please contact us directly.
Shading Practice Tool FAQs
Is the Shading Practice Tool free to use?
Yes. The Shading Practice Tool is completely free — no account needed, no subscription, no login, no hidden costs. Open it in any browser and start your shading practice immediately.
What is a shading reference tool?
A shading reference tool gives artists a visual guide for understanding how light and shadow behave on a three-dimensional form. Unlike a static diagram, this tool lets you move the light source in real time so you can see all zones of light and shadow respond dynamically — making it a far more effective shading reference for both teaching and practice.
What is value in art?
Value refers to how light or dark something is — independent of its color. It is one of the seven elements of art and the primary tool artists use to create the illusion of three-dimensional form on a flat surface. Strong value contrast makes drawings look solid and convincing. Weak value contrast makes them look flat.
How do I use this as a shading reference while drawing?
Open the Shading Practice Tool on a second screen, a tablet, or a projector while you or your students draw from a still life or photo reference. When you need to check where a shadow falls or how reflected light behaves, move the light source on the form to match your lighting setup and use it as a live shading reference.
How should you shade a drawing using the zones of light and shadow?
Start by identifying your light source direction. Then look for all zones of light on your subject — highlight, midtone, core shadow, reflected light and cast shadow. Use the Shading Practice Tool to see each zone in isolation before applying them to your drawing. Work from light to dark, keeping your lightest lights and darkest darks in their correct zones relative to the light source.
What are the zones of light and shadow?
The zones of light and shadow are: highlight (brightest point), light area (broader lit surface), midtone (transition between light and shadow), core shadow (darkest part of the shadow on the form), reflected light (subtle light bouncing back from nearby surfaces) and cast shadow (shadow the form throws onto surrounding surfaces, created by the object/form blocking the light source). Together these zones describe how any form responds to a single light source.
Does the Shading Practice Tool work on Chromebooks?
Yes. The tool runs entirely in any modern browser with no downloads or installation required. It works on Chromebooks, laptops, tablets and desktops.