Grid Drawing Tool
How Artists Have Used Grid Drawing Throughout History
The idea of using a grid for drawing is older than oil paint. Long before photography gave artists a shortcut to accuracy, the grid was how working artists solved the proportion problem — how do you faithfully transfer what you see in real life, or in a small study sketch, onto a much larger surface?
Renaissance Artists
In Renaissance workshops, artists stretched strings across a wooden frame to create a physical grid they could peer through while looking at their subject. What they saw in each section of the string grid was then transferred to the corresponding section of the drawing surface. It was painstaking, methodical work — but it produced results that freehand observation alone rarely could.
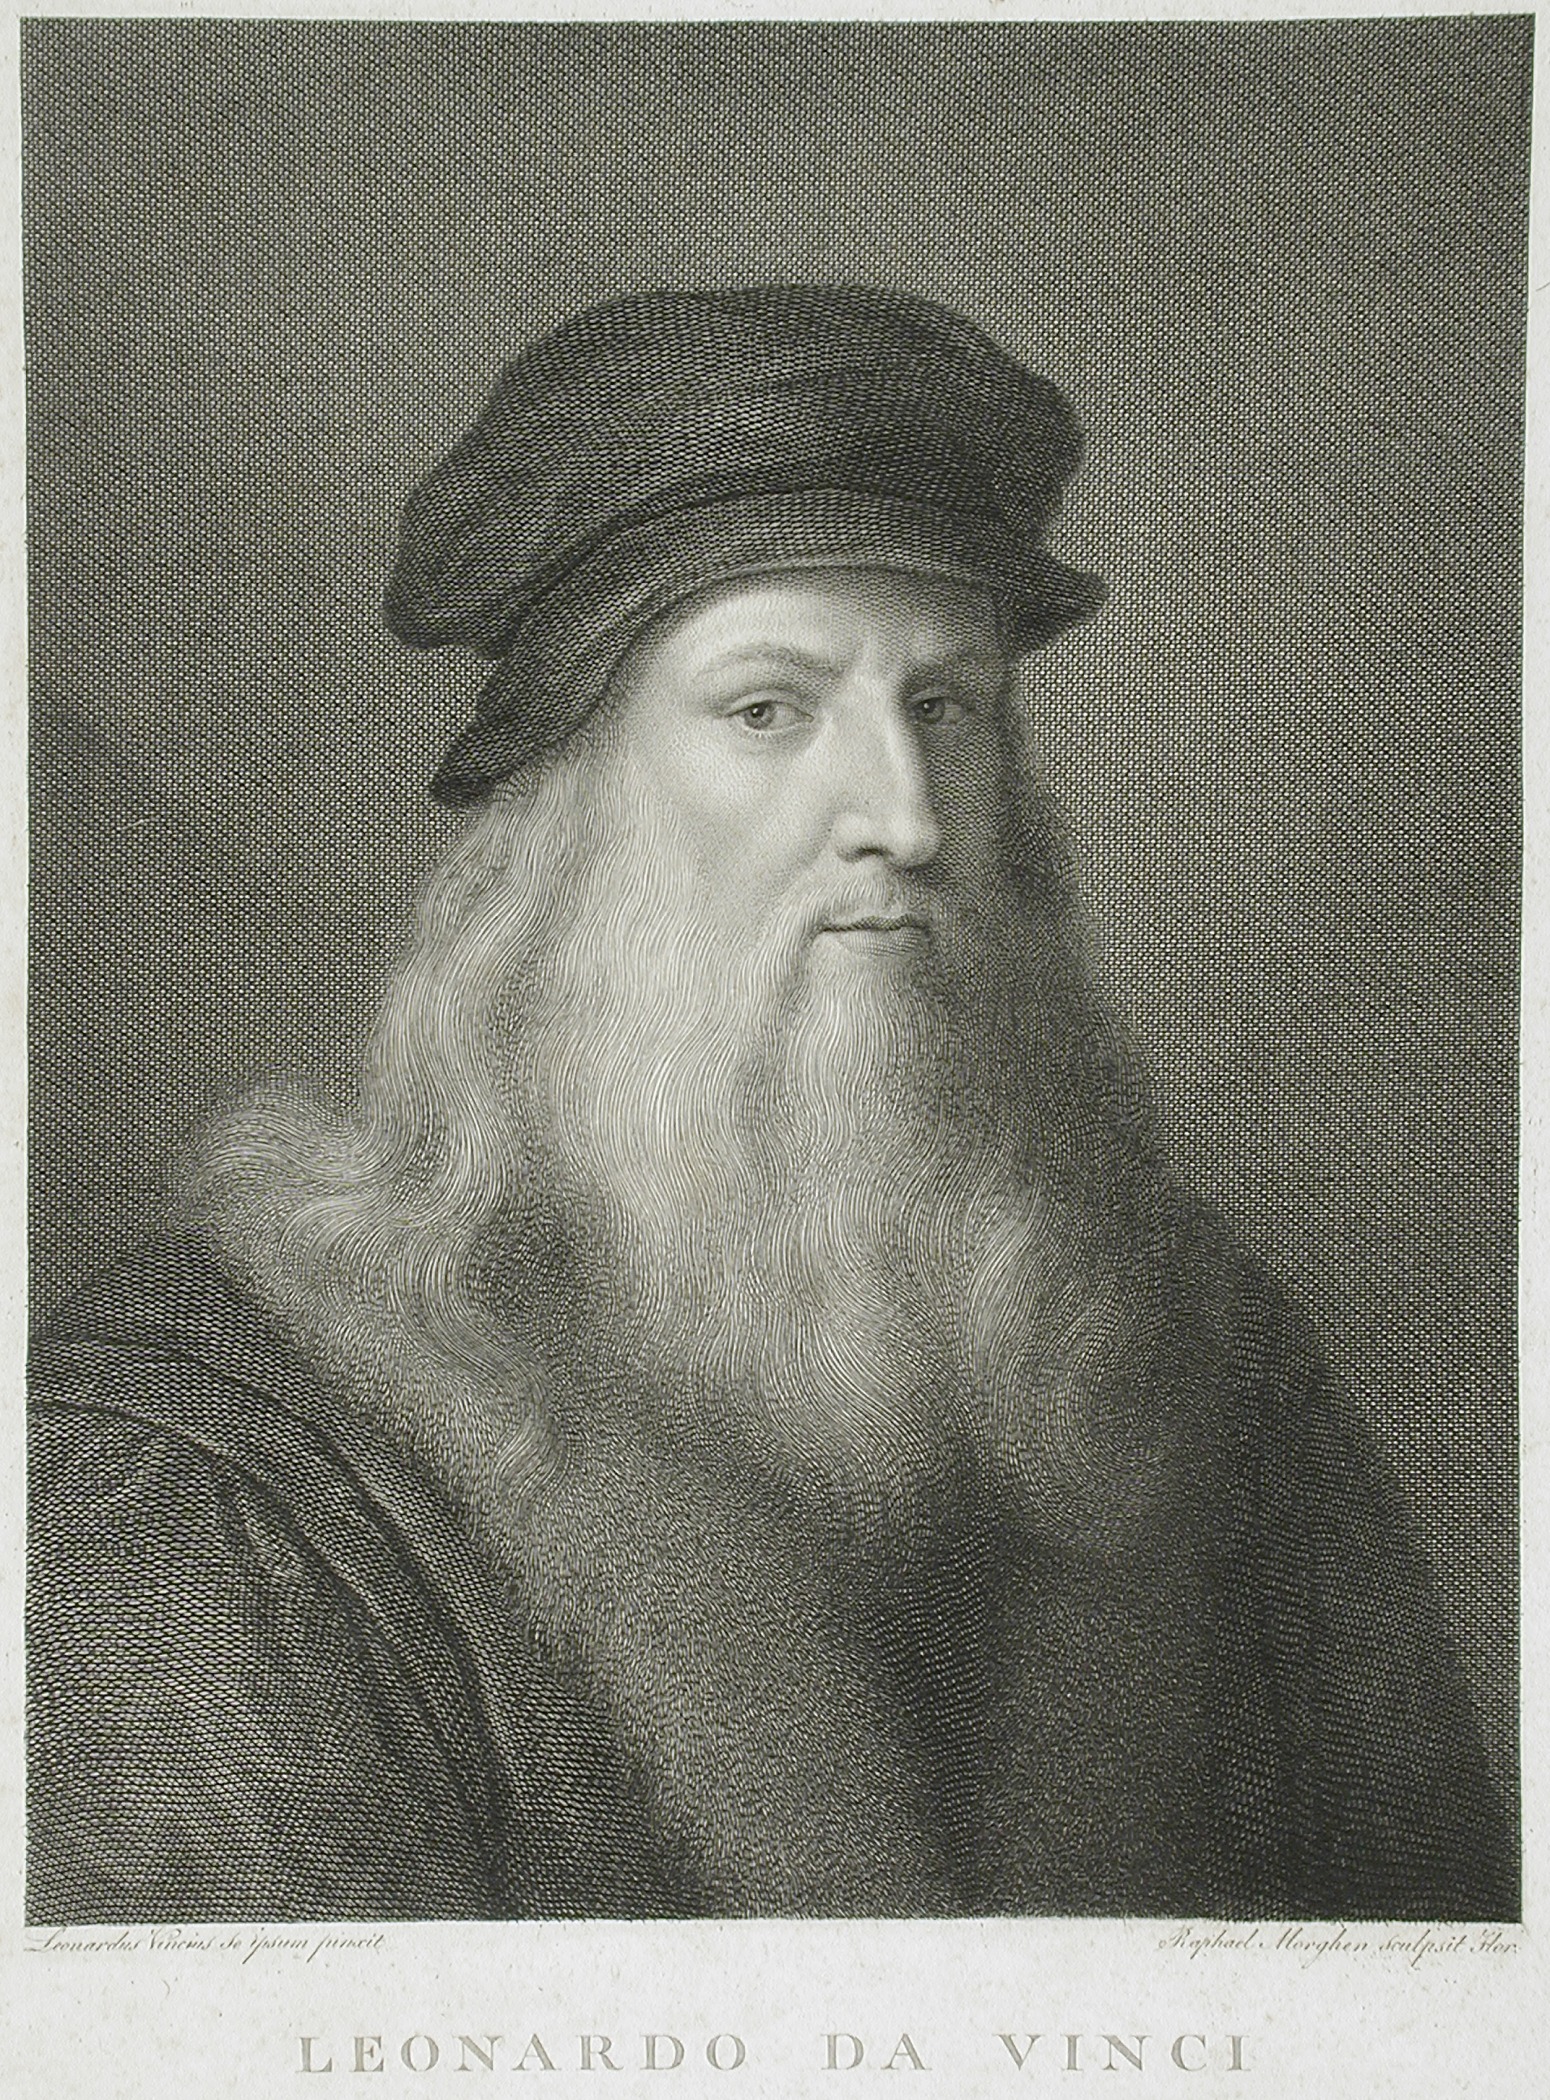
Norman Rockwell
By the time Norman Rockwell was working in the early to mid-20th century, the grid method had evolved alongside photography. Rockwell famously worked from photographs, projecting or gridding reference images to transfer compositions accurately to his large canvases before painting. The grid was simply part of a professional illustrator’s workflow — a precision tool, not a beginner’s training wheel.

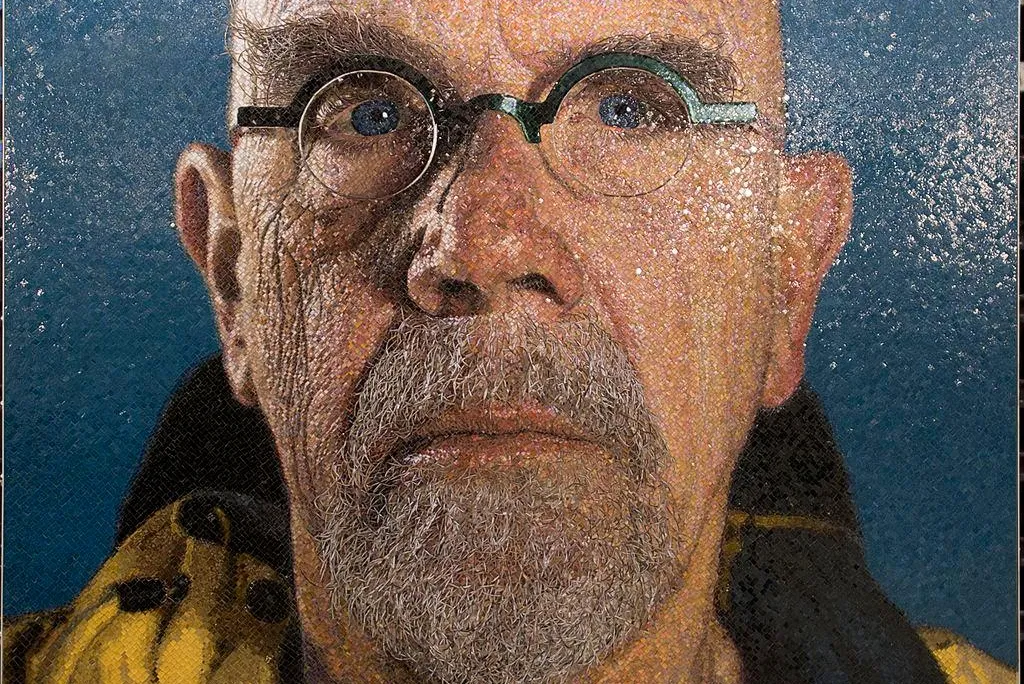
Chuck Close
Chuck Close took the grid from a transfer tool to the subject of the work itself. His massive photorealistic portraits are built square by square — each grid cell treated almost as an independent abstract painting. The viewer steps back and the face emerges. Close didn’t use the grid in spite of his ambition; he used it because of it. The grid made the impossible manageable.
Grant Wood
Best known for his painting American Gothic, Grant Wood used grid transfers for his large-format Regionalist paintings, working out compositions in small studies before committing them to the full canvas. The grid gave him the freedom to plan and revise at small scale before scaling up to the final work.

Diego Rivera
Diego Rivera used a version of the same approach at a completely different scale. Moving a small preparatory sketch onto a wall that might be thirty feet tall requires the kind of mathematical precision that eyeballing simply cannot provide. Rivera’s assistants would scale up grid sections one at a time, transferring the sketch to the mural surface in a process that could take days before a single brushstroke of paint was applied.
.jpg)
The common thread across all of these artists is this: the grid is a measuring tool. It doesn’t make art for you. It gives you a reliable spatial framework so that your observational and expressive decisions can land where you intend them to.
Choose the Right Drawing Grid for Your Subject
Not every subject needs the same grid. One of the most practical skills a student can develop is learning to match grid density to the complexity of what they’re drawing. Here’s a straightforward guide:
Still Life
Simple objects and still life compositions work well with larger grids — fewer squares, more room to move within each cell. A 4×4 or 6×6 grid gives students clearly defined sections without overwhelming them with reference points. For a first-ever grid drawing, this is always the right starting point.
Portraits
Portraits and faces require more squares because the critical information — where the eye sits relative to the nose, how the mouth relates to the chin — is concentrated in a small area. A tighter grid creates more reference points in the areas that matter most. Students drawing faces for the first time often benefit from a 10×10 or 12×12 grid, which breaks the face into sections small enough to handle one observation at a time.
Landscapes
Landscapes and environments depend on what’s in them. A wide open landscape with a simple horizon line and broad sky can work with a looser grid. A landscape with architectural elements, complex foliage, or figures in it needs a tighter one. When in doubt, go denser — it’s easier to work confidently in a larger grid cell than to realize mid-drawing that your sections were too big to capture the detail you needed.
Animals
Animals often have the tricky combination of complex surface texture and subtle proportional
relationships — a slightly wrong leg length or eye placement reads immediately as “off.” Medium grid
density works well: tight enough to catch proportion issues early, loose enough that students aren’t
overwhelmed by the number of cells to complete.
Patterns
Abstract and pattern-based work is where grid drawing opens up in unexpected directions. The X grid, radial grid, and detailed grid options in the Photo Grid Generator let students apply unconventional structures to their references — which can generate compositional ideas and abstract interpretations that a standard square grid wouldn’t suggest.
What subjects work best for grid drawing practice?
Still life objects, portraits, animals, and architectural subjects all work well for grid drawing. Still life and simple objects are the best starting point for beginners because the shapes are clearly defined and the stakes feel lower. Portraits are the most common subject for intermediate grid drawing because facial proportions are something viewers are highly sensitive to — even small inaccuracies read as “wrong.” Advanced students often find that complex animals or figure studies push their grid drawing skills the furthest
Grid Drawing
Traditional vs Digital Workflows
The grid method works in both traditional and digital contexts, but the workflow is meaningfully different
in each — and it’s worth understanding both so you can guide students appropriately.
Traditional Media
In traditional media, the drawing grid lives on the paper itself, drawn lightly in pencil before any real drawing begins. The gridded reference image is either printed, displayed on a screen, or — with the Photo Grid Generator — projected on a classroom board. Students work in pencil first, transferring proportions and key lines into each grid cell before erasing the grid and proceeding with their chosen
medium. The cardinal rule: grid lines go down lightly. If they’re drawn too heavily, they’ll show through finished work or leave an indentation in the paper surface.
For Digital Art
In digital workflows, the process is cleaner in some ways and more nuanced in others. A student using a digital drawing application like SimplDraw can use the built-in grid overlay feature to maintain the grid throughout the drawing process — turning it on to check placement and off to see the work without the distraction of the lines. There’s no erasing required, no risk of smudging. The gridded reference from the Photo Grid Generator can be displayed on a separate screen or tab while the student draws in another.
Pros & Cons
One advantage of the digital workflow that often surprises students: the ability to undo and the ability to work in layers means the grid method becomes even more forgiving. Students can explore proportional choices, check them against the grid, and adjust without the physical commitment that pencil on paper requires.
One thing both approaches share: the grid works best as a guide for the first pass of a drawing, not as something that should still be heavily referenced by the time detail work begins. The goal is always to use the grid to get proportions and placement right early, then trust your eye for the rest.
Frequently asked questions
Looking for clarification? Browse our FAQs or contact us directly.
FAQs About Using a Grid for Drawing
What is a drawing grid and how does it work?
A drawing grid is an evenly spaced series of horizontal and vertical lines overlaid on a reference image and replicated at the same proportions on a drawing surface. By working one grid cell at a time, artists can transfer accurate proportions from a reference to their drawing without needing to measure the whole image at once. The Photo Grid Generator creates this grid overlay automatically from any uploaded image.
Is grid drawing a good way to learn to draw?
Yes — and it teaches skills that extend well beyond the grid itself. Working within a grid trains students to look carefully at specific sections of an image rather than drawing from symbol memory. Over time, that careful looking builds proportional instincts that carry into freehand drawing. Many art educators use the grid method specifically because it bridges the gap between observational drawing and freehand confidence.
What is the best grid size for a beginner using a grid drawing tool?
Larger squares — meaning fewer cells overall — are the right starting point for most beginners. A 4×4 or 6×6 grid over a simple reference gives students sections that are spacious enough to work in without feeling rushed. As confidence grows, progressively tighter grids introduce more proportion precision without overwhelming the student.
Can I use a free photo grid for any type of image?
Yes. The Photo Grid Generator gives you a free photo grid for any uploaded image — photographs, paintings, illustrations, still life setups, portraits, landscapes, or anything else. The tool processes images directly in your browser, so your reference photos are never stored or shared externally.
How is a digital grid drawing tool different from drawing a grid by hand?
Drawing a grid by hand with a ruler takes time, requires precision, and risks damaging the reference image. A digital grid drawing tool like the Photo Grid Generator applies a perfect, evenly spaced grid to any image in seconds, with no measuring and no risk to the original. The gridded image can then be printed, projected, or displayed on a device — giving teachers and students more options for how they use it.
Does Using a Grid for Drawing Mean You’re Not Really Drawing?
No. The grid is a spatial measurement tool — the same category as a ruler, a viewfinder, or a plumb line. Every mark made within a grid cell is still a drawing decision made by the student. The grid establishes where things go; the student still has to observe carefully, make marks, control line quality, and develop the composition. Professional artists have used grids as part of their practice for centuries precisely because accuracy and creative decision-making are not mutually exclusive.
Common Mistakes Students Make With the Grid Method (and how to Fix Them)
Even with a solid grid drawing tool in hand, students run into predictable stumbling blocks. Knowing what to watch for saves you from spending the last ten minutes of class troubleshooting the same issues across thirty drawings.
1. Not drawing lightly.
Students who draw their grid lines with a heavy hand can’t erase them cleanly when the drawing is finished. Those lines show through color, shading, and even finished work. Establish from the very first session that grid lines go down lightly — barely there. Some teachers have students use a light blue or non-photo blue colored pencil for their grid, since it reads as faint under graphite and is easy to distinguish from the actual drawing.
2. Looking at the whole pic.
When working with a drawing grid, you should look at one square at a time, not the whole image. The grid only works if students actually commit to looking at one section in isolation. Students who keep referencing the full image lose the proportional benefit of the whole exercise. Train students to mentally block out everything outside the current square — look only at what’s in that box, draw only what’s in that box, then move on.
3. Jumping around.
Some students draw the parts they’re most comfortable with first and skip the harder sections. This almost always leads to proportion problems when the skipped squares get filled in and things don’t align. Instead, students should have a consistent working order when grid drawing — left to right, row by row from the top — and be sure to hold students to it!
4. Using uneven squares.
If a student’s paper grid doesn’t match the proportions of the gridded reference exactly, the grid drawing won’t transfer accurately no matter how carefully they work. Before anyone picks up a pencil, walk through how to calculate the right square size for their specific paper dimensions. Every square on the paper must be the same size as every other square.
5. It’s not a tracing exercise.
The goal isn’t to reproduce a miniaturized copy of the reference — it’s to practice observing and translating what you see. Students who approach the grid as pure copying miss the perceptual skill development that makes the exercise valuable. Remind them: look carefully, make a considered mark, and move on. The grid is a guide for your eye, not your hand.
6. Leftover lines.
You should not have leftover grid lines in your finished grid drawing. The drawing should be able to stand on its own once the grid is removed. Some students forget to erase their drawing grid, or can’t erase it because of Mistake 1. Make “erase your grid” an explicit step in your lesson wrap-up so that it is not an afterthought in your grid drawing process.